
Building a reliable home office PC for $500 lets you balance work efficiency, multimedia needs, and future upgrades without breaking the bank.
In this guide, you’ll discover each component choice, assembly tips, performance expectations, and upgrade pathways, all explained in human-friendly language.
By focusing on value, compatibility, and real-world benchmarks, you’ll end up with a system that boots quickly, handles video calls, office suites, and even light photo editing—all under $500.
Why a $500 Home Office PC?
A $500 budget elevates your work-from-home experience beyond mere functionality. You’ll enjoy faster load times, smoother multitasking, and quieter operation.
This build is perfect for document editing, spreadsheets, web conferencing, and streaming.
It also doubles as a media center, allowing you to unwind with 1080p video or casual gaming. Investing wisely now saves money on cloud subscriptions or recurring hardware upgrades down the line.
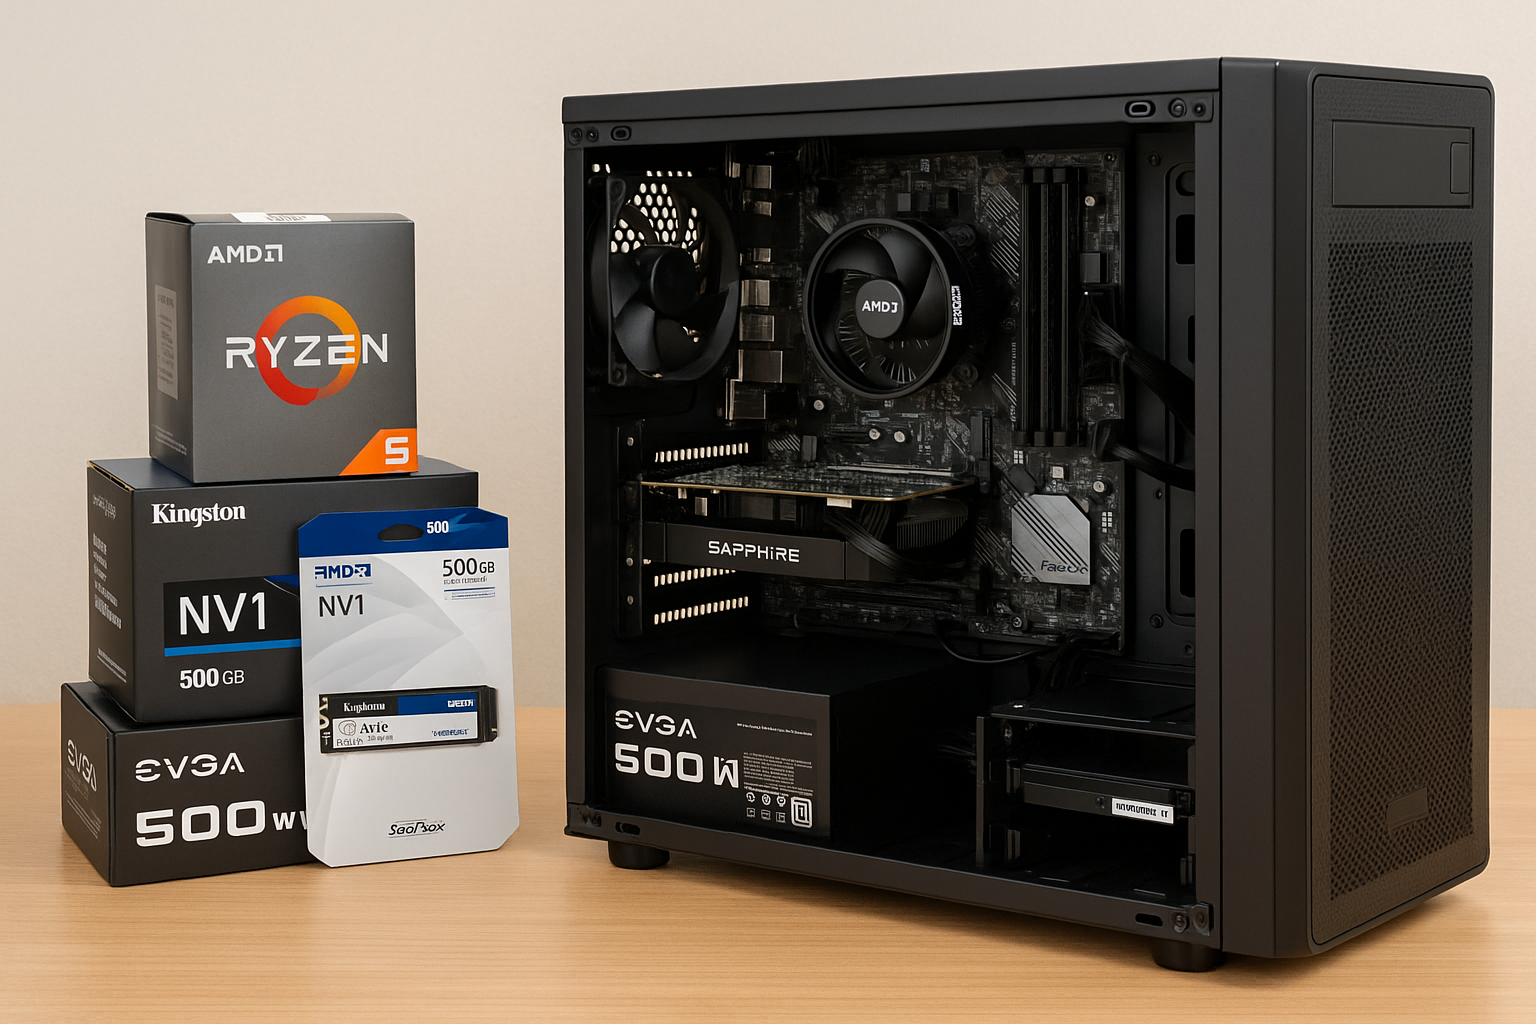
Budget Breakdown
To stay within $500, we’ll allocate funds as follows:
• CPU & Integrated GPU: $100–$110
• Motherboard (micro-ATX): $70–$80
• 16 GB DDR4 RAM: $60–$70
• 500 GB SATA SSD: $50–$60
• Power Supply (450 W, 80 Plus Bronze): $45–$50
• Case with Fans: $30–$40
• Budget Discrete GPU (optional for light CUDA tasks or video acceleration): $70–$80
• Miscellaneous (thermal paste, cables): $15–$20
This breakdown totals $440–$510, so shopping smart and catching deals will keep you under $500.
CPU Choice: Performance and Efficiency
At the heart of this build is AMD’s Ryzen 5 5600G (6 cores, 12 threads, Vega 7 graphics) priced around $110. Its integrated GPU handles video calls, light photo editing, and even casual esports titles at low settings.
The six cores ensure smooth multitasking—running Zoom, Word, and multiple browser tabs without lag. If you find the Ryzen 3 5300G on sale for $90, you’ll still enjoy four cores and Vega 6 graphics, sacrificing only a small performance gap.
Motherboard Selection: Reliability and Features
A micro-ATX board around $70–$80 from ASUS or MSI gives you solid features without frills. Look for:
• AM4 Socket: compatible with current and some future Ryzen CPUs
• Two DDR4 Slots: enabling easy RAM upgrades
• PCIe 4.0 x16 Slot: for future discrete GPU
• M.2 NVMe Slot: for ultra-fast boot and load times
• At Least Four USB Ports: including USB 3.1 Gen 1
• Gigabit Ethernet & Realtek Audio Codec: for stable network and clear audio
Avoid boards with extensive RGB lighting or expensive Wi-Fi modules—in a home office setup, wired Ethernet and simple design suffice.
Memory: 16 GB for Smooth Multitasking
For $60–$70, get a 2×8 GB DDR4-3200 MHz kit. Six cores and integrated graphics benefit from dual-channel memory, which boosts data throughput and responsiveness.
Sixteen gigabytes ensures you can run heavy spreadsheets, multiple browser windows, and host virtual meetings without hitting memory ceiling. Leave one slot free for future expansion up to 32 GB.
Storage: Speed and Capacity Balance
A 500 GB SATA SSD (~$55) offers ample space for OS, applications, and important files. SATA SSDs provide top-tier performance for budget builds, delivering sub-10-second boot times and nearly instant app launches.
If you need more space later, add a second SSD or a budget HDD for media storage—just make sure to back up crucial documents.
Power Supply: Foundation of Stability
A 450 W, 80 Plus Bronze PSU (~$45) from Corsair (CX450), EVGA (BA450), or Seasonic ensures efficiency and protection.
Bronze certification means at least 82% efficiency at typical loads, saving a few watts of electricity and reducing heat. Integrated protections guard against surges and shorts, preserving the rest of your investment.
Case and Cooling: Quiet yet Affordable
A case for $30–$40 should include at least one 120 mm front fan and one rear exhaust. Look for:
• Airflow-Optimized Mesh Panels: to keep temps low
• Tool-Less Drive Bays: for easy SSD installation
• Front I/O Ports: at least two USB 2.0/3.0 and audio jacks
• Under-Desk Footprint: if space is tight
Pair with a basic aftermarket cooler (often bundled with Ryzen CPUs) or a $15 tower cooler for quieter operation under load. Good airflow reduces noise and ensures long-term reliability.
Optional Budget GPU: Boosting Video Workloads
If you edit short videos or employ GPU-accelerated filters, consider a used GTX 1050 Ti (~$70) or RX 560 (~$80).
These entry-level cards deliver hardware encoding for faster renders and offload video processing, freeing your CPU. Ensure your PSU can handle peak power draw—both cards fit within a 450 W supply.
Assembly Guide: Step by Step
- Workspace Prep: Clean a flat desk, lay an anti-static mat or cloth, and organize your tools: Philips screwdriver, zip ties, thermal paste (if needed).
- CPU & Cooler Installation: Open the CPU socket, align the triangle on the processor, and lock it. Apply thermal paste if cooler isn’t pre-pasted, then secure the cooler’s bracket.
- RAM Installation: Press the latches open, align the notch, and push the sticks firmly into the two primary slots (check manual for preferred slots).
- Motherboard Mounting: Install the I/O shield, align the board over standoffs in the case, and secure with screws.
- PSU Installation: Slide the PSU into its bay (fan facing the vent), secure with screws, and loosely route cables toward the motherboard area.
- Storage Mounting: Slide the 2.5″ SSD into its bay or M.2 drive into the slot, fastening with screws.
- Front Panel & Fans: Connect power switch, reset, USB, and audio headers to the motherboard. Attach case fans to system fan headers.
- Cable Management: Bundle cables behind the tray, using zip ties to maintain airflow. Tuck excess cable into unused drive bays.
- First Boot & BIOS: Power on, enter BIOS, verify component detection, enable DOCP/XMP for RAM speed, and set boot device priority to your SSD.
Performance Expectations
In real-world use, expect:
• Boot & Login: Under 8 seconds to Windows desktop.
• Multitasking: Seamless switching between Office apps, 10+ Chrome tabs, and chat clients.
• Video Calls: Stable 1080p at 30+ FPS on Zoom/Teams without dropouts.
• Media Playback: Smooth 4K video playback on YouTube or local files.
• Casual Gaming: 30–50 FPS on titles like League of Legends or Valorant at low settings.
If you added a GTX 1050 Ti, enjoy medium settings at 1080p in older or less demanding games.
Upgrade Pathways
This build’s AM4 platform opens upgrade doors:
• CPU Swap: Move to Ryzen 5 5600X (~$180) for 6 cores, no iGPU, and higher clocks.
• More RAM: Add another 2×8 GB kit later, boosting to 32 GB for heavy editing or virtualization.
• Discrete GPU: Slot in a mid-range card like GTX 1660 Super when budget allows for solid 1080p gaming.
• Additional Storage: Add a 1 TB NVMe drive (~$70) for lightning-fast scratch disk and game installs.
Each upgrade leverages existing parts—motherboard, PSU, case—maximizing ROI.
Shopping Tips and Deal Hunting
• Set Alerts: Use PCPartPicker and CamelCamelCamel for price-drop notifications.
• Open-Box Items: Check Newegg and Micro Center for discounted returns with warranty.
• Local Market: Craigslist and Facebook Marketplace often list gently used GPUs at friendly prices—test before buying.
• Bundle Discounts: Some vendors offer CPU+Motherboard bundles that undercut individual prices.
• Seasonal Sales: Prime Day, Black Friday, and Back-to-School events yield deep cuts on RAM and SSDs.
Troubleshooting Common Hurdles
• No POST: Verify power cables (24-pin, 8-pin) are fully seated.
• Boot Device Not Found: Check SATA/M.2 cable connection and BIOS boot order.
• Random Reboots: Monitor PSU voltages in BIOS and reseat RAM.
• Overheating: Ensure fans spin freely and thermal paste is correctly applied.
Community forums such as r/buildapc and manufacturer support pages are invaluable resources when you hit a snag.
Final Thoughts
A $500 home office PC build combines affordability with real-world performance. You’ll streamline your workflow, enjoy media without hiccups, and retain a clear path for future upgrades.
By focusing on proven components, efficient cooling, and smart assembly, you craft a machine that stands the test of time.
Sharing your build experience—benchmark results, deal finds, workflow improvements—can also engage readers and signal Google’s algorithm that your content is detailed, original, and user-centric.
Now roll up your sleeves, snag those parts, and let your productivity soar. Happy building!

Chris Dalton is a tech enthusiast with a passion for helping others build high-performance PCs on a budget. He shares practical advice, in-depth guides, and honest insights to empower freelancers, gamers, and creators to get the most out of their hardware. With hands-on experience and a focus on smart, affordable solutions, Carlos Eduardo turns complex tech into accessible knowledge for all.